WhatsApp chatbots, part 1: the setup nobody documents well
Every business I talk to in Colombia wants the same thing: a WhatsApp number that answers on its own. Not email, not a web chat widget, not an app. WhatsApp.
The bot itself is the easy part. The part that eats a day is everything before it: five nested objects in Meta's account model, a test number that can only talk to five people, a token that dies in 24 hours, and a pricing page that changed shape in 2025. This series builds a real WhatsApp chatbot end to end, and this post is the boring, necessary first half-day.
The plan:
- Setup: the account model, the app, the test number, your first message and your first webhook (this post).
- The webhook server: Node/NestJS, signature verification, idempotency, and why you must answer in under five seconds.
- Conversation state: the 24-hour window, templates, and handing off to a human.
- Plugging in a model: tools, guardrails, and keeping the token bill sane.
- Going live: a real number, business verification, quality rating and monitoring.
Everything here comes from walking the flow myself in September 2026. Meta moves this console around; if a button moved, the object model below still holds.
Three different products share the name "WhatsApp Business"
Before touching anything, know which one you want:
- The WhatsApp Business app: the green app your local bakery installs on a phone. Free, no API, quick replies and labels. A human has to type.
- The WhatsApp Business Platform, Cloud API: Meta hosts it, you call a REST endpoint. This is what the series uses.
- The On-Premises API: the old self-hosted Docker stack. Meta has been retiring it in favour of the Cloud API. Don't start a new project on it.
You can also go through a BSP (Twilio, 360dialog, Infobip). They wrap the same API with a nicer console, a sandbox that works in five minutes, and a margin on every message. Going direct is cheaper and, once you've read this post, not harder.
The five objects, and how they nest
This is the part that confuses everyone, because Meta's UI shows you the leaves and never the tree:
Meta (Facebook) account          ← you, a human
└── Business portfolio           ← the company; owns assets, gets verified
    ├── Meta app                 ← your code's identity; holds the WhatsApp product
    └── WhatsApp Business Account (WABA)
        └── Business phone number  ← the number customers write to
Two more things are not objects in that tree but you can't send a message without them: an access token (proves the app may use the WABA) and a webhook (an HTTPS URL of yours that Meta posts to when someone writes).
Names you'll see in the API: WABA_ID, PHONE_NUMBER_ID. The phone number ID is not the phone number — it's an ID for the number inside the WABA, and it's what goes in the URL.
Step 1: create the Meta app
Go to developers.facebook.com → My Apps → Create app. The name is internal: no customer ever sees it.
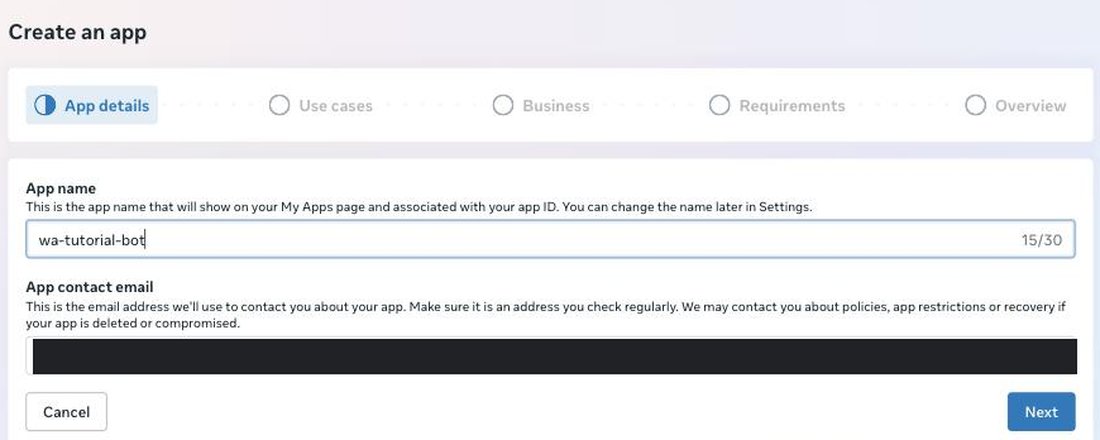
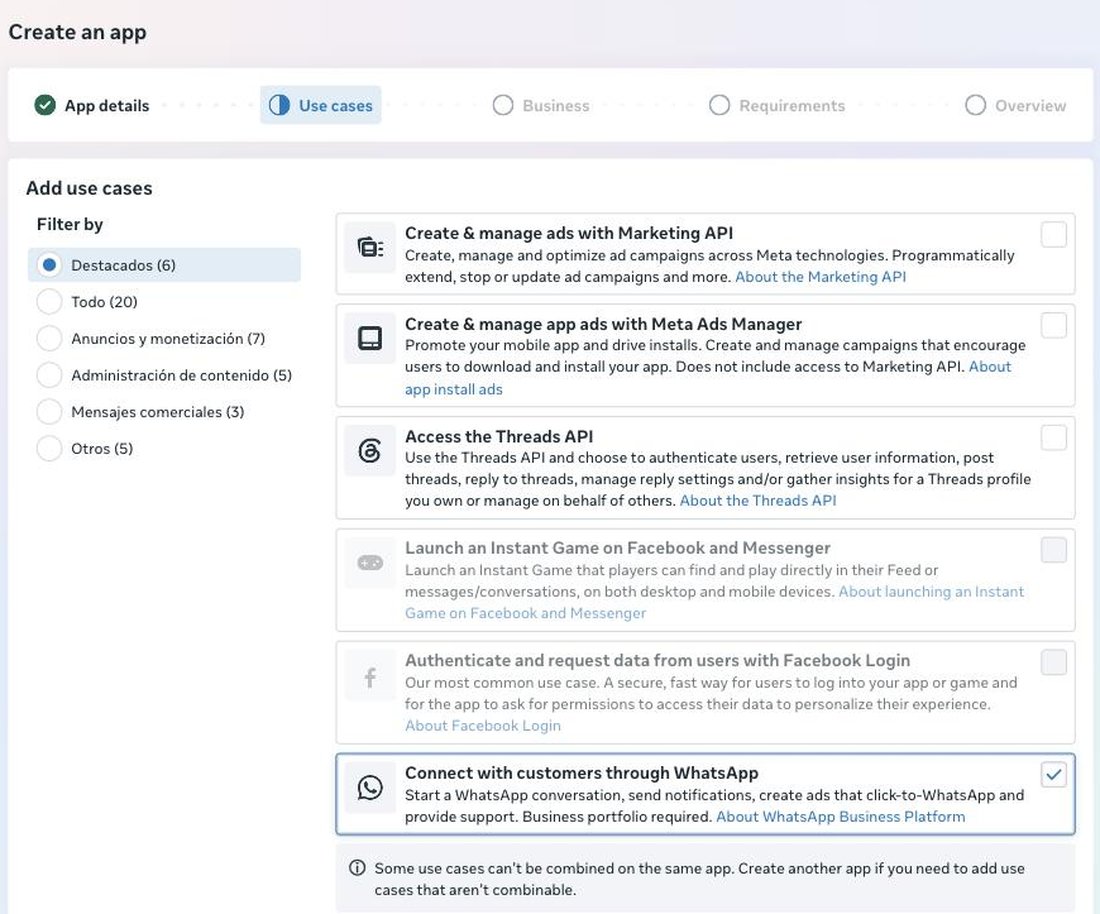
Next comes the use case. Pick Connect with customers through WhatsApp — this is what adds the WhatsApp product to the app. Note the line in the card: "Business portfolio required."
Then the wizard asks which business portfolio owns the app.
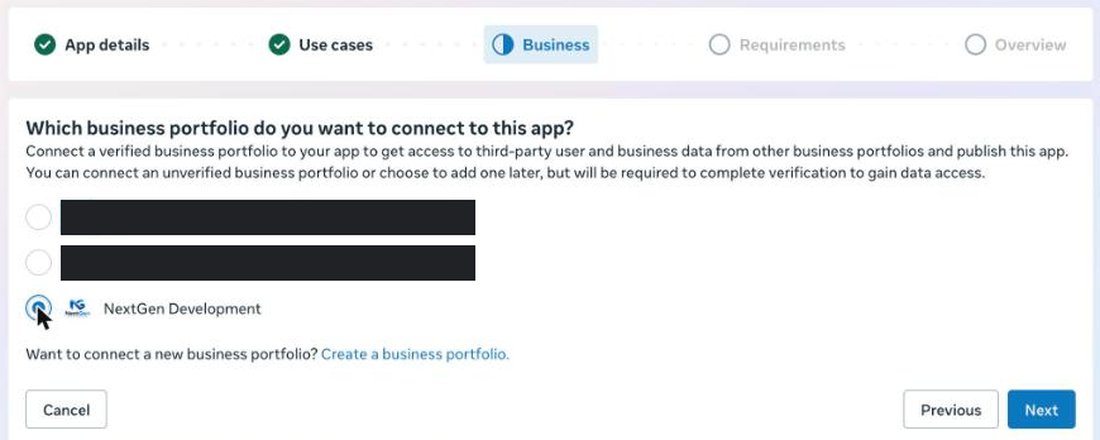
Two traps here, both of which I hit:
- There's a cap on business portfolios per person. Try to create one too many and you get "Maximum number of businesses reached", with no number and no way to raise it in the UI. If you already manage a few businesses, plan to reuse one.
- Meta asks for your Facebook password again at the last step, after the review screen. Have it ready; the wizard keeps your answers if you fail it.
The portfolio does not have to be verified yet. Unverified is fine for the test number and for development; verification becomes a requirement when you want a real number with real limits, which is part 5.
Step 2: the test number you get for free
Older tutorials tell you to look for a WhatsApp entry in the app's left menu with an API Setup page under it. That menu is gone. In the current console you go to Use cases → Customize, accept the WhatsApp Business and Cloud API hosting terms once, and you land in a guided flow with three steps: Try it out, Production setup, Business verification.
It opens with the same tree I drew above, which is a good sign that the tree is the thing to understand:
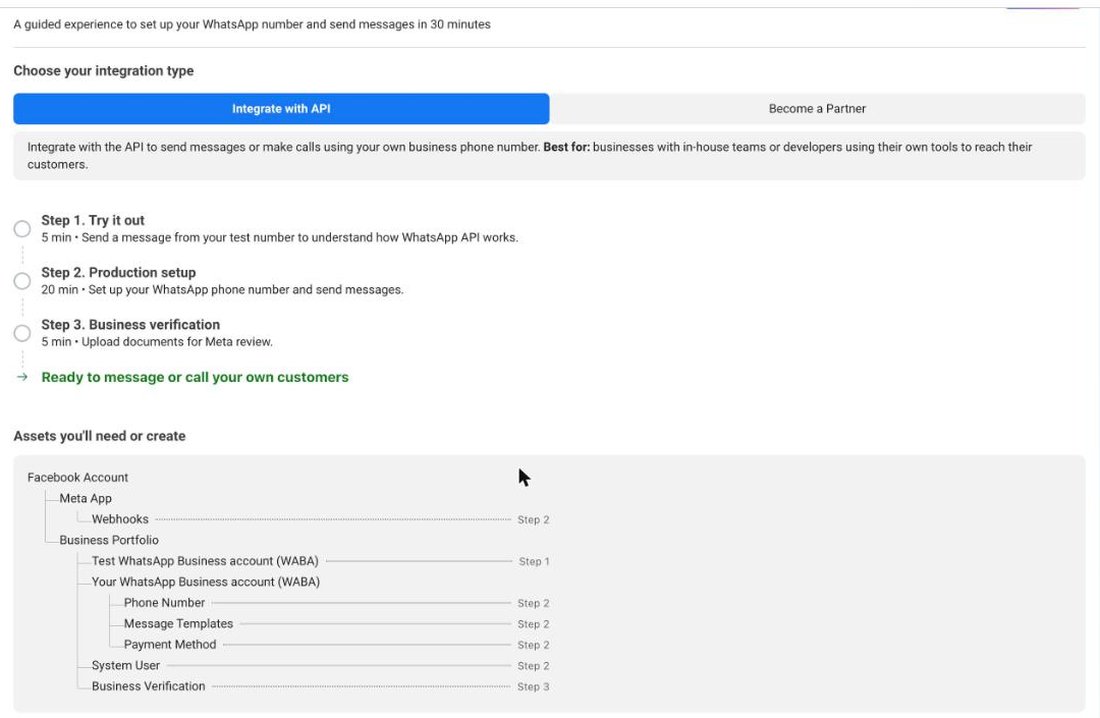
Step 1. Try it out claims a test number for you automatically. At no cost you get:
- a test business phone number (a US number, owned by Meta, not transferable),
- its Phone Number ID and the WhatsApp Business Account ID,
- an access token you create with Generate token,
- a recipient picker where you can add up to five phone numbers, each verified by a code,
- a prefilled
curlwith a sample template, a Run in Postman button, and a live Check test webhooks panel.
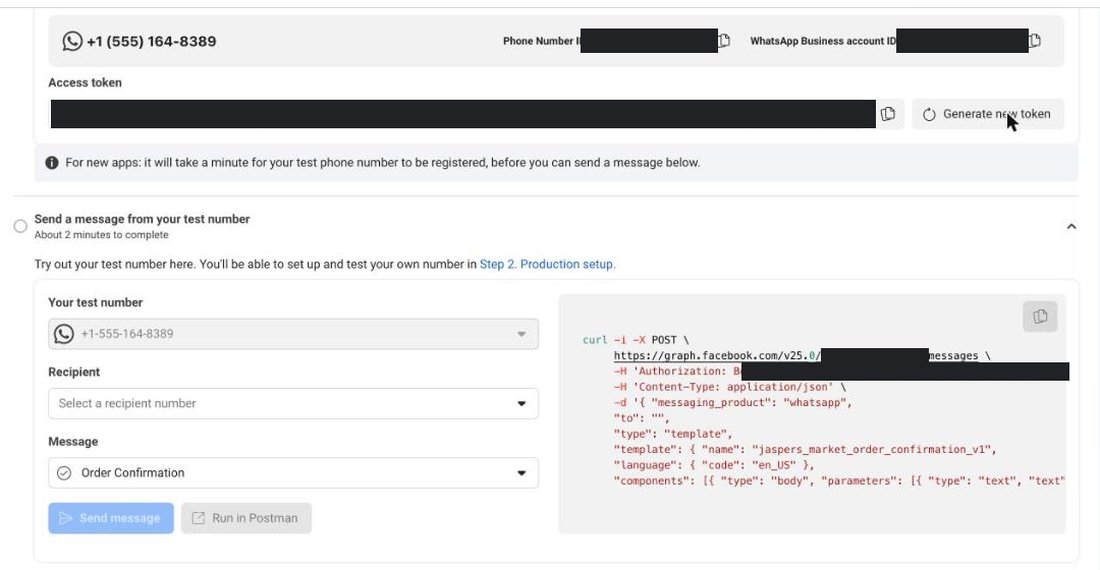
That's the sandbox. It's genuinely useful — you can build the whole bot against it — but be clear about what it isn't: you cannot promote the test number to your business number later, and you cannot message anyone outside those five verified numbers.
The token from that panel is a 24-hour token. Don't wire it into anything you'll still be running tomorrow, and don't commit it. The permanent one comes from a system user; see step 6.
Step 3: your first message, from the terminal
The whole API is one endpoint shape:
curl -X POST \
  "https://graph.facebook.com/v25.0/$PHONE_NUMBER_ID/messages" \
  -H "Authorization: Bearer $WHATSAPP_TOKEN" \
  -H "Content-Type: application/json" \
  -d '{
    "messaging_product": "whatsapp",
    "to": "573001112233",
    "type": "template",
    "template": {
      "name": "jaspers_market_order_confirmation_v1",
      "language": { "code": "en_US" }
    }
  }'
Three details that cost people an afternoon:
- The version: the console prefilled
v25.0for me today. Copy whatever it shows and pin it. Graph API versions are supported for about two years and then start failing. to: country code, no+, no spaces, no dashes.573001112233, not+57 300 111 2233.- That name is a template, and that's deliberate. To a person who has never written to you, you can only send a pre-approved template. Free-form text is rejected. New test accounts come with sample templates preloaded — mine had an "Order Confirmation" one called
jaspers_market_order_confirmation_v1; older tutorials usehello_world. Use the dropdown in the console to see what your account actually has.
A success looks like this, and the wamid is the message ID you'll match against later in webhooks:
{
  "messaging_product": "whatsapp",
  "contacts": [{ "input": "573001112233", "wa_id": "573001112233" }],
  "messages": [{ "id": "wamid.HBgMNTczMDAxMTEyMjMzFQIAERgS..." }]
}
Once that person replies, you have 24 hours in which plain text works:
curl -X POST \
  "https://graph.facebook.com/v25.0/$PHONE_NUMBER_ID/messages" \
  -H "Authorization: Bearer $WHATSAPP_TOKEN" \
  -H "Content-Type: application/json" \
  -d '{
    "messaging_product": "whatsapp",
    "recipient_type": "individual",
    "to": "573001112233",
    "type": "text",
    "text": { "body": "Hello from the Cloud API" }
  }'
Step 4: receiving messages
Sending is a REST call. Receiving is a webhook, and Meta needs a public HTTPS URL with a valid certificate. In development that means a tunnel:
npx localtunnel --port 3000
# or
cloudflared tunnel --url http://localhost:3000
# or
ngrok http 3000
Your endpoint has to answer two different kinds of request. The first is the one-time verification handshake: a GET with hub.mode, hub.verify_token and hub.challenge. The verify token is a string you invent and paste into both the console and your code. Echo the challenge back as plain text:
import express from "express";

const app = express();
app.use(express.json({ verify: (req, _res, buf) => (req.rawBody = buf) }));

app.get("/webhook", (req, res) => {
  const mode = req.query["hub.mode"];
  const token = req.query["hub.verify_token"];
  const challenge = req.query["hub.challenge"];

  if (mode === "subscribe" && token === process.env.VERIFY_TOKEN) {
    return res.status(200).send(challenge);
  }
  return res.sendStatus(403);
});
The second is the real traffic: a POST for every inbound message and every status change. Answer 200 immediately — Meta retries anything slow or failed, and retries turn one customer message into several.
app.post("/webhook", (req, res) => {
  res.sendStatus(200); // first, always

  const value = req.body.entry?.[0]?.changes?.[0]?.value;
  const message = value?.messages?.[0];
  if (!message) return; // delivery status, not a message

  console.log("from", message.from, "text", message.text?.body);
});

app.listen(3000);
The payload is nested deeper than you'd expect, and the array shape is not decoration — a single notification can carry more than one message:
{
  "object": "whatsapp_business_account",
  "entry": [{
    "id": "<WABA_ID>",
    "changes": [{
      "field": "messages",
      "value": {
        "messaging_product": "whatsapp",
        "metadata": { "display_phone_number": "15550001111", "phone_number_id": "<PHONE_NUMBER_ID>" },
        "contacts": [{ "profile": { "name": "Nicolás" }, "wa_id": "573001112233" }],
        "messages": [{
          "from": "573001112233",
          "id": "wamid.HBgMNTczMDAxMTEyMjMzFQIAERgS...",
          "timestamp": "1790022604",
          "type": "text",
          "text": { "body": "hola" }
        }]
      }
    }]
  }]
}
Back in the console the webhook form lives in Step 2. Production setup → Configure Webhooks: paste the callback URL, paste the same verify token, and hit Verify and save. Then subscribe to the messages field — saving the URL is not enough, and if you skip the subscription the handshake passes while no message ever arrives.
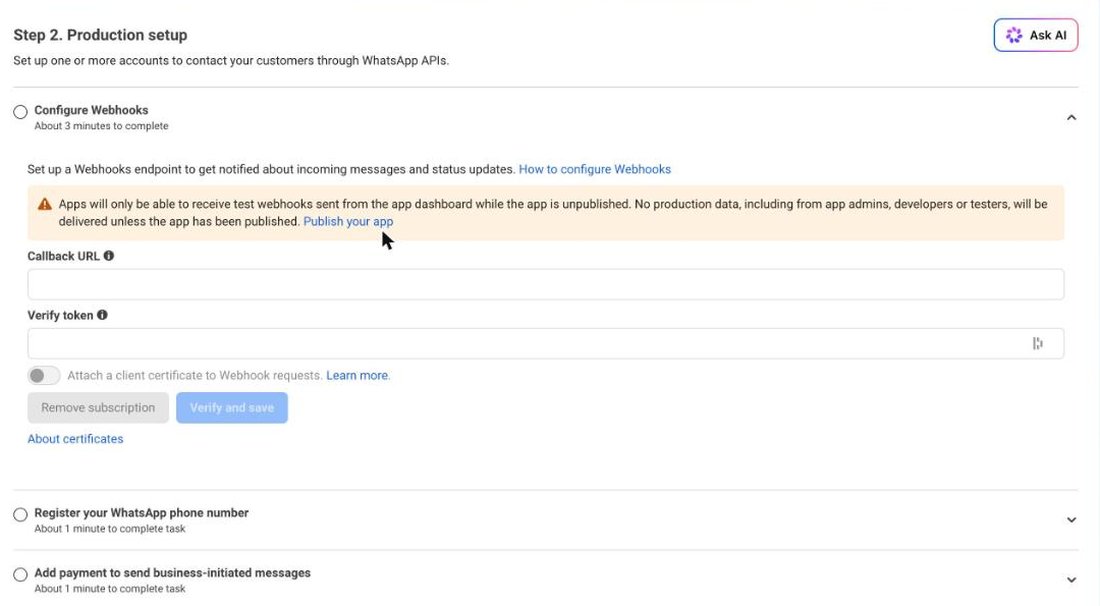
That orange banner is the second hour-killer: "Apps will only be able to receive test webhooks sent from the app dashboard while the app is unpublished. No production data, including from app admins, developers or testers, will be delivered unless the app has been published." So while you develop, the messages you see are the ones the console's own test panel generates. Real inbound messages from a real phone need a published app, which is part of going live.
Step 5: read the pricing page before you design the bot
Meta moved to per-message pricing on 1 July 2025; the old per-conversation model is deprecated. Messages fall into four categories: marketing, utility, authentication and service. What matters for a chatbot:
- Non-template messages sent inside an open customer service window are free.
- Utility templates delivered inside that window are free too.
- Anything that opens a conversation from your side — marketing, authentication, a utility template outside the window — is billed per message, and prices vary by country.
- Conversations that start from a click-to-WhatsApp ad or a Page call-to-action get a 72-hour free entry point window.
And the rule that shapes the whole design: the customer service window is 24 hours from the customer's last message. Inside it, your bot says whatever it wants. Outside it, you are limited to approved templates, and template approval takes time and rejects marketing dressed up as utility.
So a WhatsApp bot is reactive by nature. If your product plan says "it will follow up three days later", that follow-up is a paid, pre-approved template, not a chat message. Better to find that out now than in the demo.
Step 6: what changes when you go to a real number
Briefly, because this is part 5's job:
- A permanent token. Business settings → System users → create one → Assign assets (the app and the WABA, full control) → Generate token with
whatsapp_business_messaging,whatsapp_business_managementandbusiness_management. Store it as a secret; it doesn't expire, which cuts both ways. - A number that isn't in use. The number you register must not be active on the WhatsApp or WhatsApp Business app, or you have to migrate it and lose the chat history on that device.
- A display name that gets reviewed against Meta's naming policy, and a two-step verification PIN you will absolutely forget.
- Business verification and messaging tiers: you start capped at a low number of unique customers per day and move up based on volume and quality rating.
Where this leaves you
If you followed along you now have: an app, a test number, a token that expires tomorrow, a message you sent from a terminal, and a tunnel that prints inbound messages to your console. That's the whole platform, and it's enough to build against.
In part 2 I'll throw away the express snippet above and build the webhook service properly: payload signature verification with the app secret, idempotency on wamid (because retries will hit you), a queue so the HTTP handler stays under Meta's patience, and the message-status stream that tells you what actually got delivered.